
Thoughts on Backsplash
Christian W. Damus
This past winter I was stuck in the basement for close to three months while a kitchen and bath renovation on the main floor took over not only those spaces but also my office. So, my daily toiling was in the cold, damp, dark of the basement. But these conditions did prompt an ambitious idea: designing a kitchen backsplash for the ages.
I knew I wanted a tile backsplash that would be distinctive and — literally — unique in history. This was the old kitchen design:
The old kitchen. Imagine a refrigerator in the space between the passage and the counter on the far wall.
The backsplash was, as is so often the case, just a vertical extension of the countertop. And that countertop was an extremely impractical black square glossy tile. Ridiculous. Yes, the new backsplash must be glossy tile, but it will have panache! A very little research on the Internet convinced me that it must be a multi-coloured pattern. But not just any pattern! All the examples out there are so careful to either establish regularity in the pattern, or else to try for an even distribution of the colours. The name of the game seems to be that “you gotta keep ’em separated” where tiles of the same colour are concerned.
I knew immediately that the key to the new kitchen’s backsplash design was that it must be organic. It must feel natural. The colours must play together, must flow together, in a totally natural way. And I knew that I could not design the pattern that I needed.
Indeed, nobody could. The human brain is famous for not being able to truly grasp and reproduce the quality that I knew would make this backsplash work: randomness. That’s right. Try as you might, you cannot just sit down and draw out a random pattern. You will always try to tweak it to “make it look” more random. And by doing so, you will always introduce order into it.
No, what I needed was an actual random process to design my backsplash. Sure, that process needs to be guided (I have to choose tiles of some colour and shape, after all, in order for my contractor to buy the requisite supplies) but it must still fundamentally be random.
That meant applying computer software to this design, with the technology of pseudo-random number generation for a steerable and reproducible, but still much-more-random-than-humanly-possible outcome.
And, of course, this software does not exist. Or at least, not meeting my requirements. So I had to build it. And I had to build it before my contractor got the job far enough along to start laying tiles on the walls.
Enter the Tile-o-nator 3000, a free and open-source software application for design of very simple randomized backsplash tile patterns for any (rectilinear) shape of kitchen. You can clone the git repository and run the software on your computer or you can just run it now on this very website.

The main screen of the Tile-o-nator 3000 application.
TL;DR
If you want to just skip to the good bits, jump to the conclusion of this article where you can see the end result of my kitchen renovation project and even load up the parameters that I used to design my backsplash as a starting point for yours if you like what you see!
The Basics
At first, you’ll be faced with this simple four-colour pattern. To get started, access the pattern design settings from the button at the top-left of the page:

The main settings panel of the tile backsplash pattern.
The main controls for the design parameters are, from left to right, as follows:
- Rows and Columns
- the number of tiles to layout out in the pattern vertically and horizontally, respectively
- Orientation
- whether tiles are laid horizontally (ash shown here) or vertically (more on that, later)
- Seed
- the randomization of the tile patterns is accomplished in this tool by a pseudo-random number generator. As in all such cases, the algorithm is deterministic but behaves like a random distribution of numbers. And the computation of each number in sequence starts with a seed which in our case is a string of text. The same seed always produces the identical sequence of “random” numbers, which means that we can share the backsplash design parameters with our friends (or save them for later) and always recover the same design. Make your seed something personal and memorable. The example shown here is the name of the tile product line from the Olympia Tile+Stone company that I chose for my backsplash: the Oceani series
- Aspect Ratio
- this controls how wide (to the right of the slider) or tall (to the left of the slider) your tiles are. Here, we start with a 4:1 ratio, matching the Oceani tiles that I used
- Offset
- determines by how much the tiles of each row (or column in vertical orientations) overlap the tiles of the row (or column) before. Initially it is set for a half-lap, “subway tile” pattern
- Step Right/Left and Alternate
- these aren’t applicable for half-lapped tiles. But for other offsets, they choose whether the offset pattern steps to the right or to the left (in horizontal patterns) from one row to the next, and whether that step alternates back and forth or just marches on row by row
- Undo/Redo buttons
- allow the user to unwind and rewind changes to the settings
- Group Size
- the pattern generates each row (or column in vertical layouts) of tile colours in groups that repeat along the row. Each group of tile colours is a randomly selected subset of the available colours, but then each repetition of that group along the row has those colours in a different random order. The group size may be from 1 (one) to the number of colours available
- Complexity
- this is a number, 0 (zero) or more, that adds some tile colours to each repetition of the basic group of colours as described above. These added colours are a different random collection colours from the group, possibly repeating colours, for each repetition of the group Rotation
- depending on the physical shape of the walls that the backsplash tiles will be laid on, and the shape the overall pattern takes (more on that, later), you may find that some particular pleasing area of the pattern doesn’t land where you’d like it to be on your walls. The Rotation control lets you shift the whole randomly generated pattern horizontally along your walls until it lands just right
- Palette button
- opens the Colour Palette window for designing the tile colours that you want in your pattern and, to some extent, the relative proportions to use of each colour
At the bottom of the settings screen are facilities for saving and recalling the settings for the different backsplash patterns that you’re working on and for uploading patterns shared with you by other users, or that maybe you export for yourself from another computer.

The Colour Palette window.
The Colour Palette window is where you design the tile colours that are made available to the Tile-o-nator’s pattern generation algorithm, plus the colour of the grout that it shows between the tiles.
The initial set of colours shown here is an approximation of the colours of the Oceani product that I bought for my project. You can remove any that don’t need and can add your own using the Web-style hexadecimal code if you know it, or else a convenient colour picker or even an eye-dropper tool to snag the colour from your tile vendor’s website.
The actions available on each colour in the palette, as shown above, are:
- a checkbox to include that colour in the pattern design or not. Excluded colours are shown “greyed out” in the palette
- a star to “favourite” the colour. Favourite colours are included, if possible, in every group of tiles generated along a row. Use sparingly!
-and+buttons to reduce or increase the weight of a colour relative to others in the palette, making it more or less likely than the average to be chosen in any random group of colours. So this tunes the overall relative balance of the colours in the pattern. Relative weights are indicated by the font size of the colour name- the trash can button lets you delete a colour entirely that you know you won’t need

Adding a colour to the palette.
To add a new colour to the palette, as shown above, simply hit the + button in the blank row at the bottom. This will open the colour editor shown below:

Editing a colour in the palette.
Give the colour a name, if possible corresponding to the names of the colours in the tile product that you intend to use in your installation, and a short code that will represent that colour in the plan rendered out by the tool for your contractor to use (more on that, below). A single unique letter works best. When you have finished, simply hit the Return key or the check-mark button to commit the new colour. The swatch colour of an item in the palette can be edited any time after its initial creation.
Layout Options
Let’s have a look at what some of the various layout options do in practice. First, let’s play with the number of rows and columns in our layout:

Adjusting the number of rows and columns in the pattern.
And let’s change the shape of each tile. See how you can drag the slider to make the tiles wider than they are tall or taller than they are wide, or even square:

Adjust the aspect ratio of the tiles.
Next, let’s adjust the offset of the tiles. See how, depending on the offset, additional controls become available. We’ll look at those, next.

Adjusting the offset of the tiles.
Now that the tiles are offset, not evenly and not stacked directly one of top of another, we can see the effect of the step direction and alternation controls:

Effect of the step alternation and direction controls.
The group size determines the granularity in which colours repeat in each row. Note in particular what the effect of a group size of one is:

Group size control
And let’s tune the complexity increment to add more (or less) to the colour mix in each row. You can see how boosting the complexity results in more obvious “clumping” of colours, an effect that is a hallmark of actually random processes but which humans tend unconsciously to avoid when trying to draw a pattern that they think is random:
Tweaking the complexity for a more random feel
Holes in the Pattern
Now, of course not every kitchen will be able to accommodate a big rectangular field of tile backsplash such as we’ve designed so far. In fact, no kitchen will. There will be windows, upper cabinets, and other obstacles that need to be accounted for in the design. Let’s mark out a couple of holes in our pattern, one for a big window and one for upper cabinets, and a region where the tile can extend from the countertop all the way to ceiling above the stove:

Holes in the pattern
I remember a pleasing detail in the pattern where the window is now on the right side, that I think would figure nicely into the area above the stove. Let’s rotate the pattern to bring that around:

Rotating the pattern to place distinctive regions
Save and Share
Now that we’ve got the randomly generated pattern of backsplash tiles tuned to look just how we like it, it’s time to save our work and share it with our contractor so that they have a detailed plan to work from to realize our vision.
We start by saving our tile configuration with a name:

Saving a backsplash pattern configuration
Now we have a named configuration to which we can return at any time, make further tweaks, and save new variants as our vision for the backsplash evolves (or not).
Speaking of the vision, it’s no use keeping it to ourselves. We need to share it with our contractor so they can implement it. That is accomplished via the Export function:

Exporting the backsplash design
The Export page shows a thumbnail of the final design — the full extent of a whole-kitchen backsplash is typically wider than the example shown in this article — and a simple key of the pattern using the single-letter codes configured for each colour in the Colour Palette window:

Export thumbnail and tile map
Expand the “Tile Pattern Parameters” section to see an overview of the configuration details for the backsplash pattern. Amongst the more useful details for the implementation phase is the count of each colour of tile that is employed in the pattern:

Tile pattern parameters and colour counts
Whereas this is a nice, tidy summary of the backsplash design, it’s more information than is needed by the contractor to implement it, and not convenient for printing to share with them. To that end, the Export screen has additional sharing options: a Download function that drops a JSON file with all of the configuration parameters in your Downloads folder to share with somebody else (use the Upload button in the settings window to load the configuration), and the Contractor View.
Backsplash design export
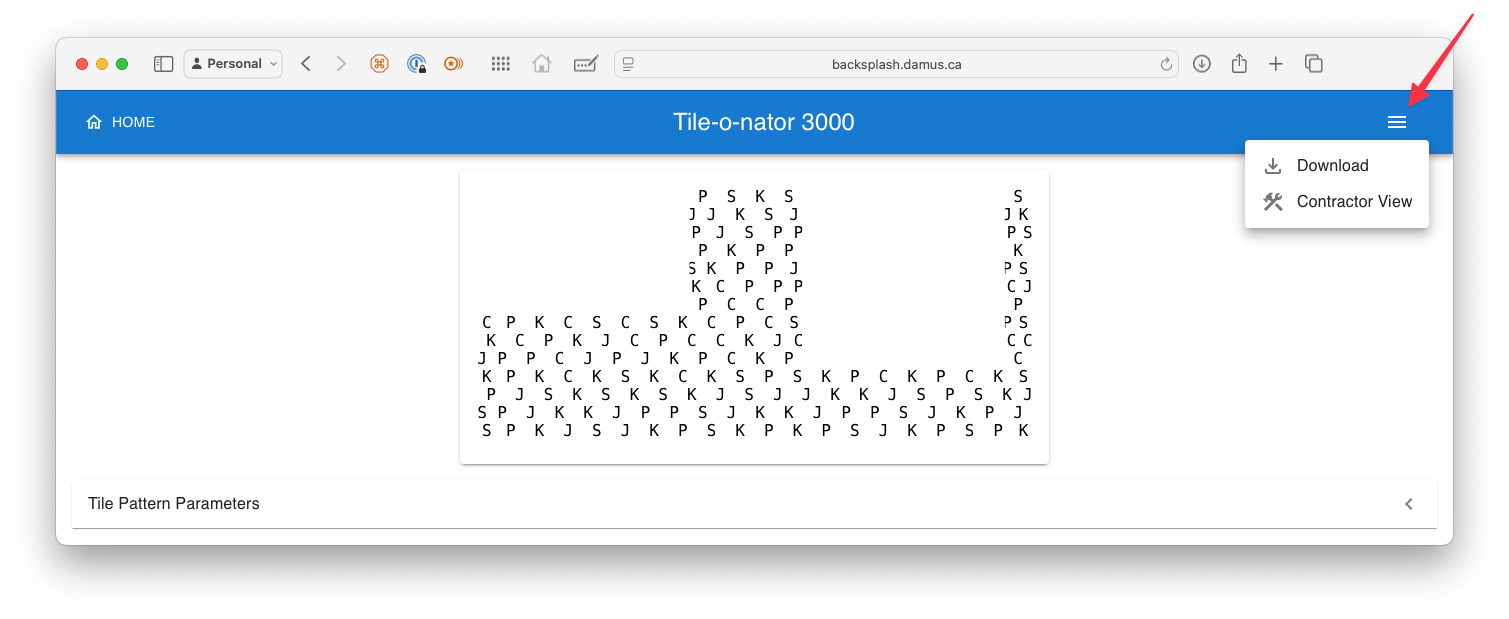
The Contractor View is a minimal presentation of the design, with the tile map, colour key, and tallies only, apart from a thumbnail rendering of the result for reference. This page is readily printable to follow on the worksite, ensuring accurate placement of each and every tile on the wall:

Contractor View
From here, the hamburger menu has an action to return to Design View shown previously and, of course, the Home button at the top left returns to the interactive design screen.
Conclusion
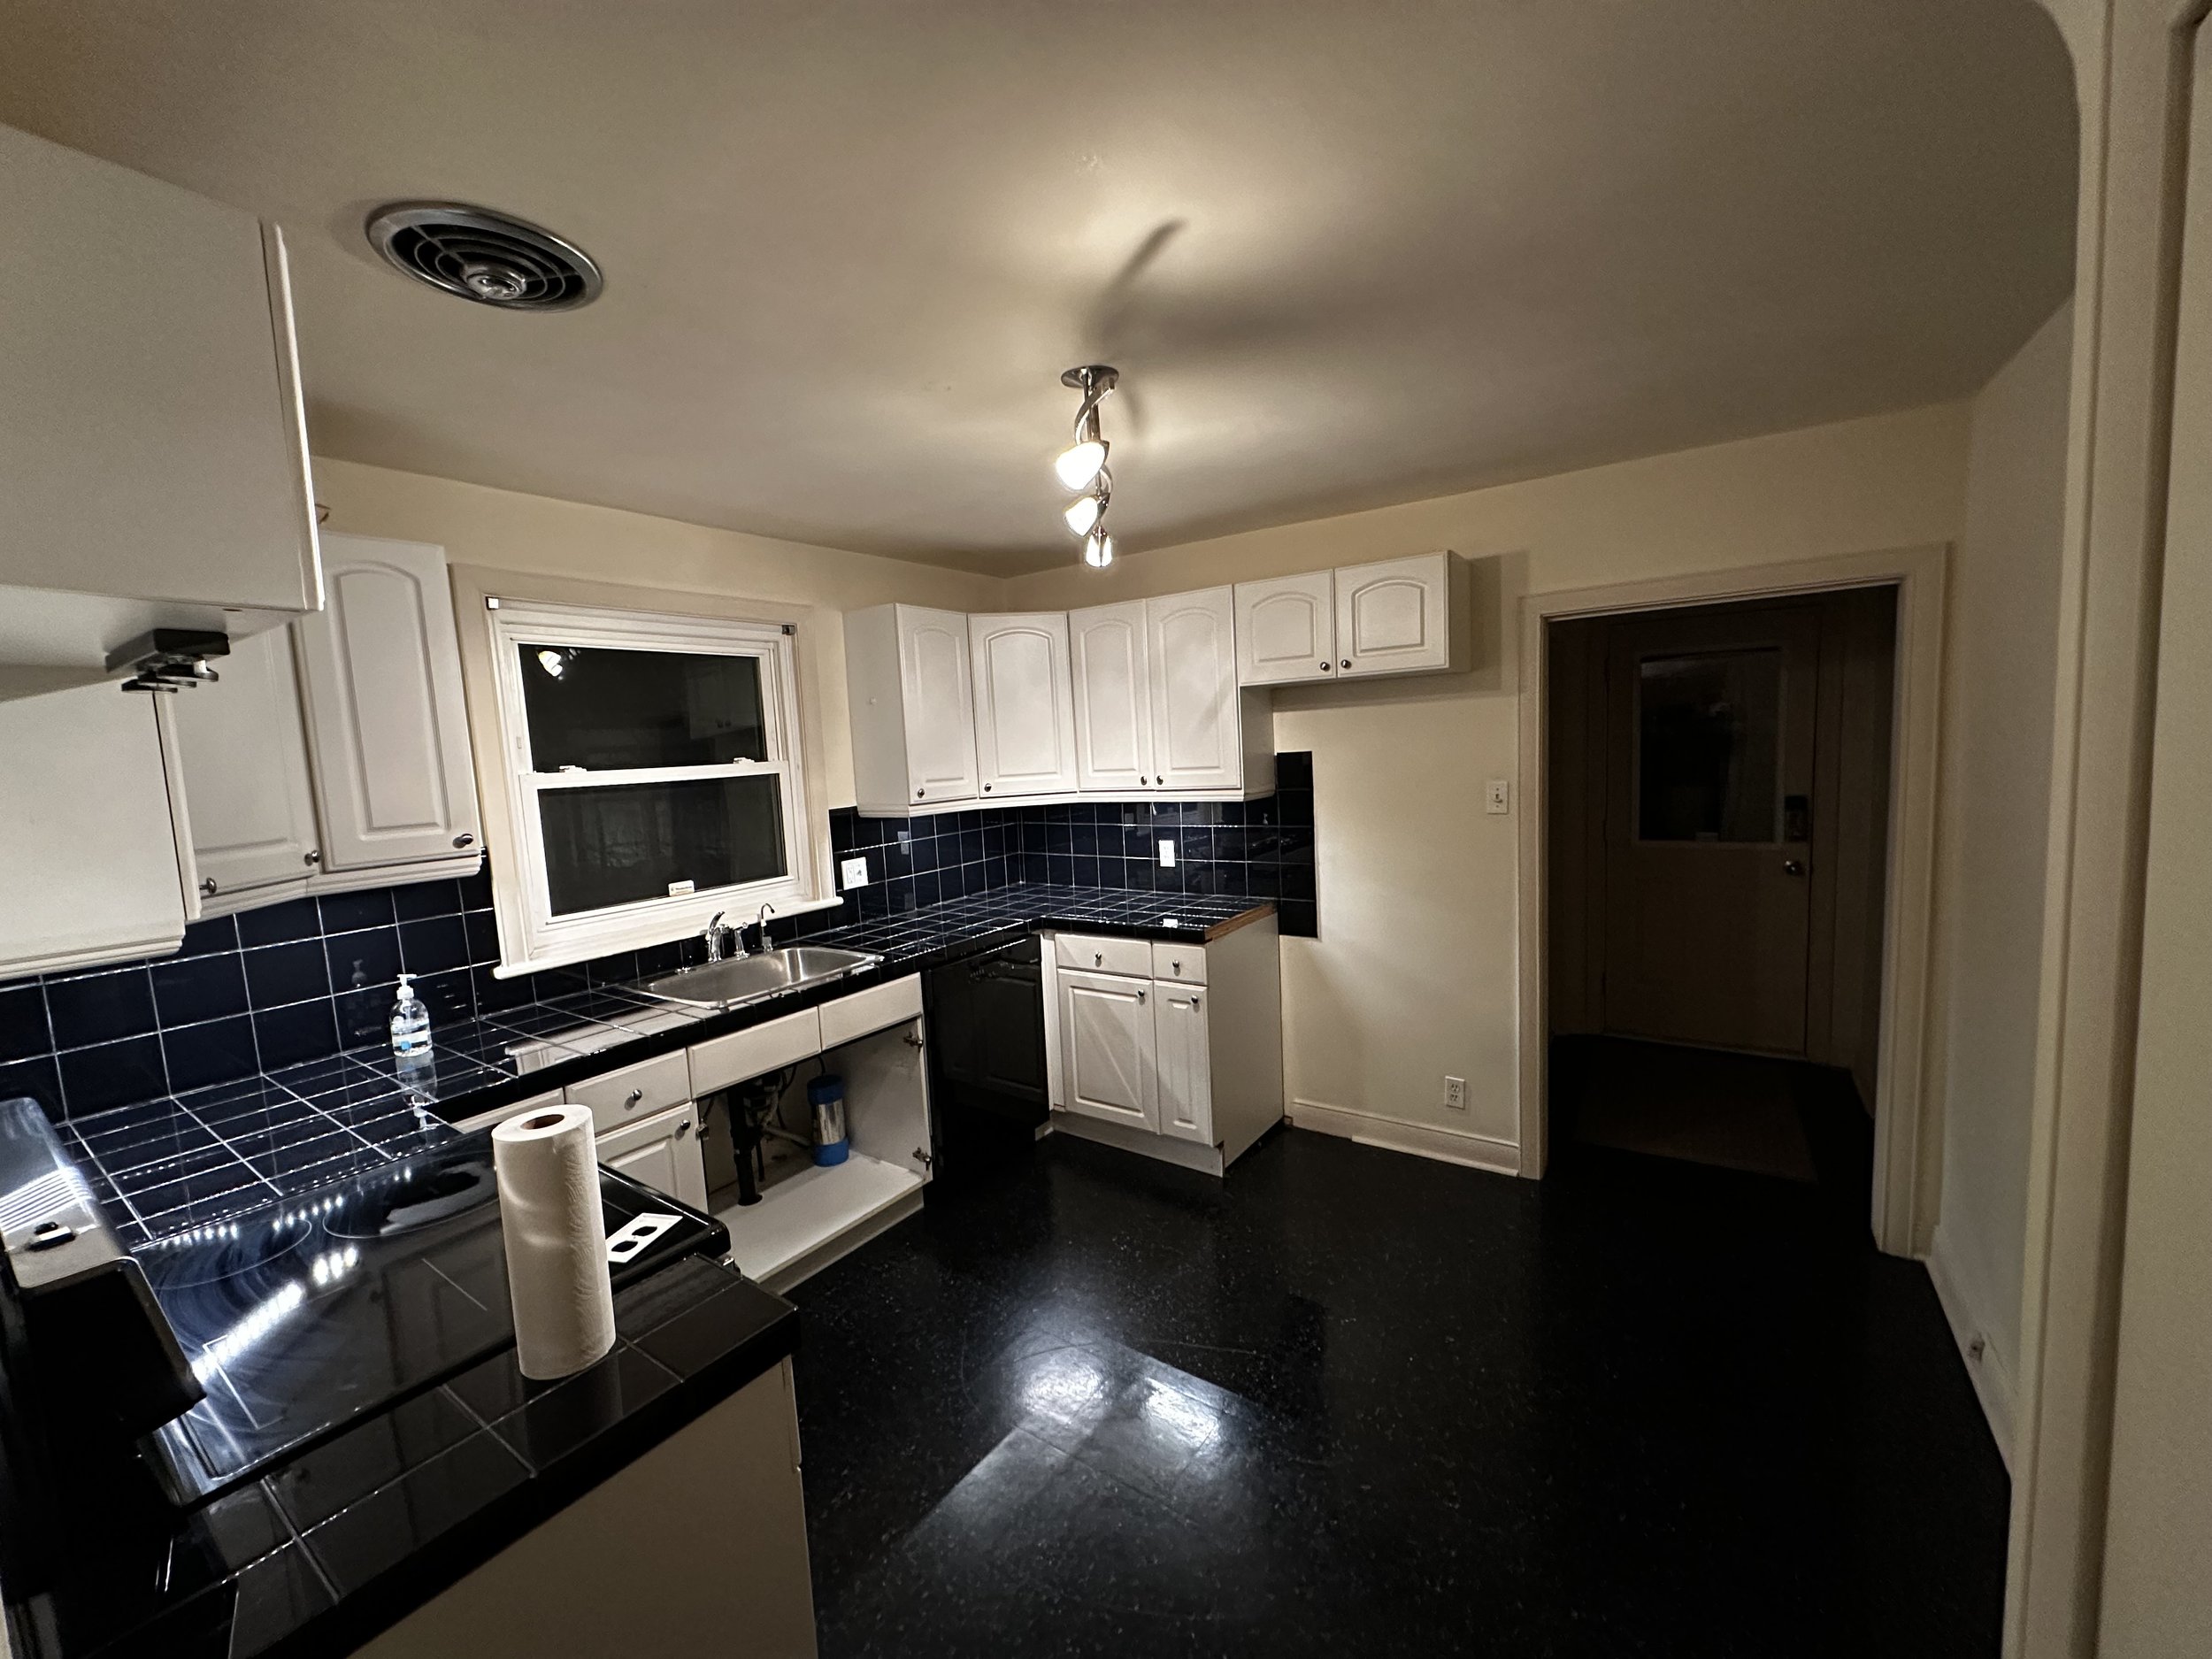
And that’s it! From conception to the detailed contractor’s plan for implementation, the Tile-o-nator 3000 can give you your very own one-of-a-kind randomly coloured kitchen tile backsplash. And if you're lucky and have as skilled a contractor as Carter Construction, owned and operated by an expert tiler, then you might wind up with a kitchen like this:

The new kitchen
If you want a kitchen that is done right and exceeds your dreams, call Josh Poirier at Carter Construction today. If you like what you see above, hit the button below to download the configuration of my backsplash. Just use the Upload button in the Tile-o-nator 3000 settings panel to import the parameters from that damus-backsplash.json file and get started tinkering with the design!
Addendum
My project was a half-lapped horizontally oriented layout of tiles in a 4:1 ratio. That works well for my kitchen. But perhaps you prefer a vertical layout? Or the application is not a kitchen but something else, perhaps a washroom or maybe a fireplace. As this article has alluded to a few times, there is an option for a vertical orientation in which the direction along which tiles are laid is not row-wise but column-wise. And in this orientation, the offset lapping of tiles and the alternation/stepping of the pattern is in the vertical direction, as shown here:

The vertical orientation of tiles
Incidentally, in the screen recording above we see how to remove holes in the pattern, filling them once again with tiles: merely Option+Click (Alt+Click on Windows) to remove a hole. And the option for stepping the pattern left/right changes to up/down in the vertical orientation.